 No quippy, I’d like to think, witty, intro to this one.
The Front Rack Reverse Lunge, it’s a bitch boss exercise.
If you do it, it’ll make you better
That should be enough.
But I have to find something semi-interesting long winded to say I guess, so here goes.
Why Reverse Lunge in The First Place:
Easier on The Knees:
Initiating the movement by sitting back into the hips activates the musculature around the hips (glutes, hams etc) preferentially.
This means you’re FAR less likely to ram the femur into the kneecap (you can, it’s just much more difficult than in forward lunges).
Initiating into the hip also helps to lessen the chances of a weight shift in the foot maintaining the majority of the foot pressure in the “2nd half”/ arch and heel of the foot.
A more vertical shin means less tibial shear and for those of you with knee pain, less pain.
More Ass and Hams:
Well executed walking lunges may be the most brutal (leg) glute and hamstring exercise known to mankind, primarily due to the large range of motion and the high eccentric forces.
But I said, WELL EXECUTED walking lunges.
If you look like a baby deer who was just doing a keg-stand when you’re doing walking lunges, they’re not well executed. <—-and you shouldn’t do them.
Most walking lunges are performed with either too much “reach”, not enough “reach”, low back rounded over or arched up, too much forward travel of the knee, foot pressure too far forward in the foot ( toes) and a collapsed ankle/ knee and or hip.
Trust me, they usually suck.
But Reverse Lunges are usually, after just a bit of coaching, not that bad and they do a special thing.
FORCE YOUR ASS TO DO SOMETHING.
It’s really hard to sit back and not get the glute to fire.
Lets face it, we all need more ass.
In comparison to the forward lunge:
“The step length of the reverse lunge will also be identical to the forward, and for that matter, the step width and neutral spinal position will also be that of the forward lunge. The key difference is the maximal hip flexion angle that the front side leg achieves, and the position of the hip throughout the concentric and eccentric portions of the movement.” –Dr. John Rusin
Basically,
Reverse Lunges = More Ass.
Ya know, somebody actually did some science here on Lunge Variations:
Comparative Analysis of Lunge Techniques: Forward, Reverse, Walking Lunge,
“reverse lunge movement was found to be favorable in achieving the primary goal of lunge exercise, which is the development of gluteus maximus and quadriceps femoris, as it resulted in higher agonist muscle activities (gluteus maximus, rectus femoris, vactus lateralis, vastus medialis) compared to the other lunges. It also can be seen as having a lower risk of knee injuries due to its relatively low momentary maximum knee shearing force compared to the other lunges.“– Biomechanics Nerd Unite!
So the Reverse Lunge is like the bees knees of lunging.
But what if we make reverse lunges more awesome(er)?

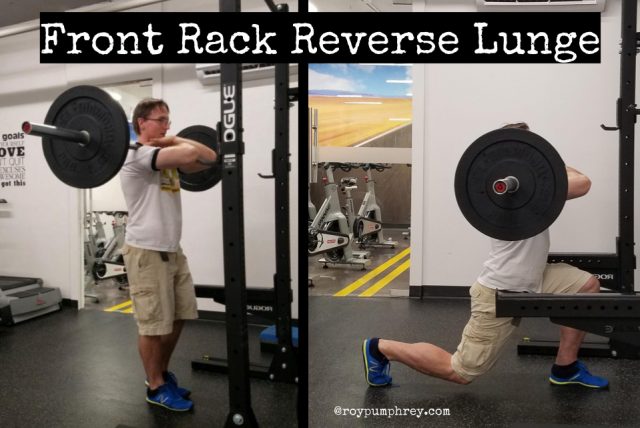
Front Rack Reverse Lunge:
Why?
Cause it’s waaaay harder.
JK, cause its better. But it is harder too.
Front Rack Reverse Lunge Benefits:
Increased Anterior Core Activation:
The front rack requires a more upright posture than the bar on the back.
This means its less advantageous to “hang off the low back”, overarching the lumbar spine and more advantageous to maintain the “Cylinder Position” created by a neutral hip and rib positioning.
“Anterior bar placement keeps the torso vertical, preventing the hips from going into an excessive anterior pelvic tilt, and requiring greater oblique and rectus abdominus involvement to prevent flexion.“- Eric Bach
Improved Stability/ Motor Control:
If you can’t own your position at any time you’ll know it.
This movement almost forces the brain to “figure things out”.
That does not mean, take the, “I’m a really poor mover, I’ll just hammer these until it get right” route.
Because it never will.
You’ll simply drive home a way to survive the movement, not thrive in it.
But once you can do a solid reverse lunge, adding the anterior load of the front rack will dramatically increase the motor control (coordination, timing and activation) of the muscles needed to successfully complete the movement.
Thoracic Extension:
Almost everyone could use more.
Sitting, rounded over, head hung down all day is destroying our posture.
In the Front Rack Reverse Lunge you’re forced to get thoracic extension and activate the often weak and underused muscles of the upper back just to keep the bar in place.
“With the barbell loaded anteriorly (in front of the body) there’s a fairly aggressive anti-flexion component of the torso, which will encourage a bit more thoracic extension.“ Tony Gentilcore
“Front squats require scapula and clavicle elevation and upward rotation to keep the elbows up and the bar in proper position. This requires the traps, serratus anterior, levator scapulae, rhomboids, and lats to work in conjunction to hold position and prevent you from dumping the bar forward.“- Eric Bach
Round over and you’re done.
Don’t believe me?
Go set up looking like Quasimodo and let me know how that goes.
Movement Intentionality:
This kinda goes along with Motor Control, but its different.
Sure motor control can have a conscious aspect.
But primarily, motor control is reflexive.
Stability is a reflexive quality that happens too fast to think about it.
So while the Front Rack Reverse Lunge can help improve motor control to really get the most out of the exercise and with even a moderate load, you NEED TO BE PRESENT.
You can’t mentally be in some far off land thinking about something else.
Drop your focus and you’re probably crapping out sh@tty reps. Or dropping the bar, collapsing the knee and having a generally terrible time.
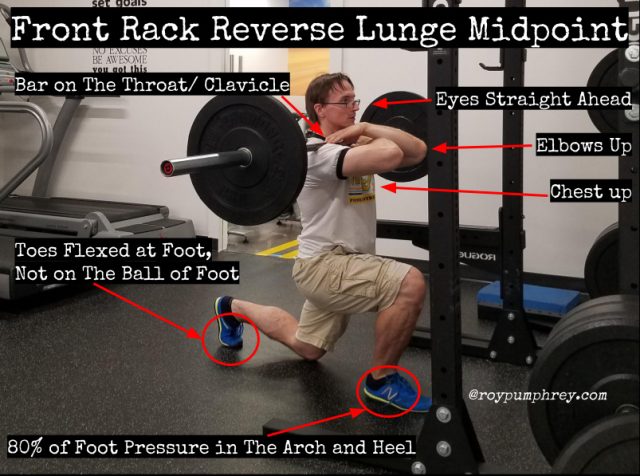 Checklist:
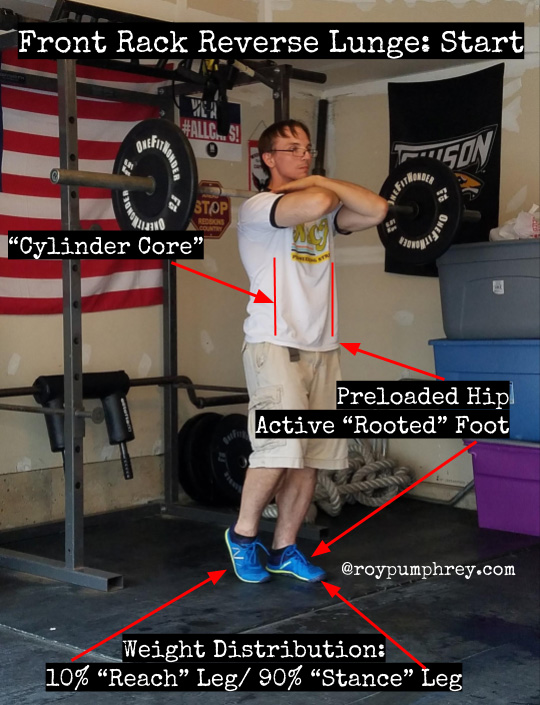
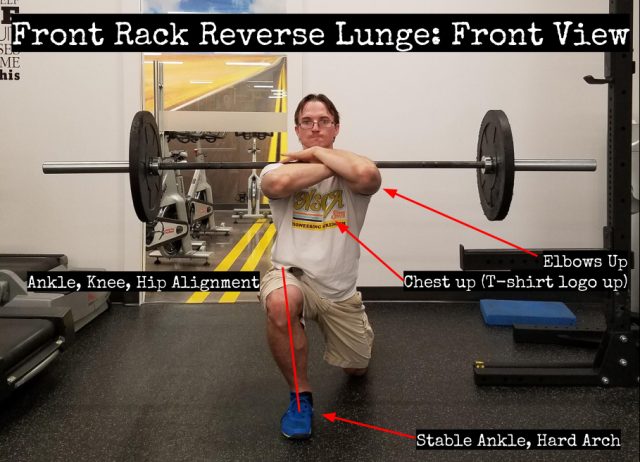
- Chest (T-shirt logo) up
- Bar Against the throat. Literally, think about choking yourself out with the bar, don’t worry you’ll get used to it quickly.
- Elbows up. FIGHT to drive the elbows up through the whole movement.
- Active front side foot: Toes spread and gripping the floor/ Active arch/ “feel the heel”
- Working hip and foot loaded PRIOR to initiation of the movement (stepping back).
- PULL yourself into the glute/ hamstring junction.
- Grip the floor and PULL yourself up through the arch/ heel.
- FINISH THE LIFT at the top. Standing on a HARD/ ACTIVE GLUTE
 Bro Tips:
- No knee pain? The knee can travel forward, but the hip should INITIATE the movement always.
- Rather use a clean grip? Fine, its probably better, I just cant do it anymore. Thanks hypertrophied right ulnar nerve.
- Heavy Weight with Low Reps….ehhhh, not for most. Maybe sometimes for some, but best to stick in the 6-15 range I think. 15 reps is easy, probably could use more weight. Below 6 reps, just too much that can go wrong for most.
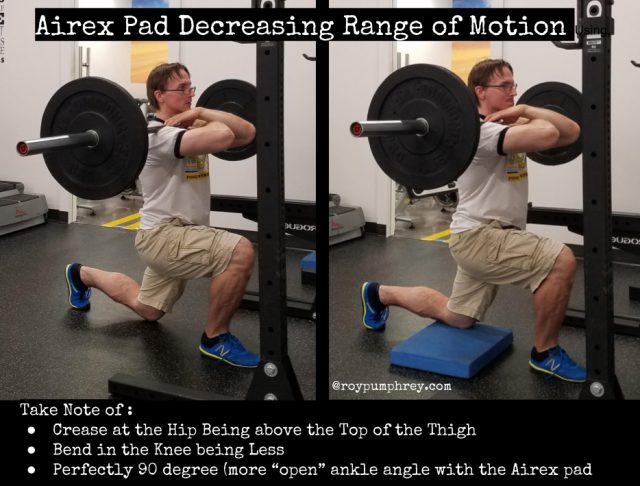
- If you’re having trouble making the range of motion work, tight ankles, tight hips, you’re super tall, just throw an airex pad or mat under the back knee.